Sunday, January 8, 2017

Android View Binding Library

Today, I'm going to post about view binding tutorial in android. So, first of all, what is view binding? View binding is a term which connects your code objects with all the views, and these views are displayed to the end user for showing the data. For example, you use

TextView title = (TextView) findViewById(R.id.tvSample);
title.setText("Hello !!!");

This is the basic view binding that we do in android. So far so good to work with it when you have only one or two views to display. But what, if you have a user profile filled with 100's of TextView's relating to users detailed info? You will have to write 100's of this lines of code, which is very time-consuming and very tiring work, plus developers are a bit lazy to do this kind of work. To overcome this issue, Mr. Jake Wharton has added a view binding library called Butter Knife. Most of you already know about it and use it in your code. Here's the link to this library.

Here is an example for binding the above TextView with your coding object.
@BindView(R.id.tvSample) TextView title;
Here, @BindView annotation is used to bind the tvSample to title object. With the latest update in the library, you will have to use an Unbinder Object to unbind or remove all the bound views when your app gets destroyed. unbinder.unbind() method to unbind all the views. For initializing it,

 @Override public void onCreate(Bundle savedInstanceState) {
    super.onCreate(savedInstanceState);
    setContentView(R.layout.simple_activity);
    unbinder = ButterKnife.bind(this);
    // TODO Use fields...
  }
onClick listener object binding as follows:
@OnClick(R.id.submit)
public void submit(View view) {
  // TODO submit data to server...
}
This is the basic view binding tutorial to know about this library. Further, we will see how this library helps in recyclerview and all other lists views adapter classes to bind their row layout items with View Objects.

Saturday, February 20, 2016

Creating a Simple Example of using TextView, EditText and a Button

In this post, I'm going to start creating a small project by taking a TextView, EditText and a Button.
First up, you need to create the XML Layout for this three widgets to show in the app. Here is the XML code that you need to write in your activity_main.xml

<?xml version="1.0" encoding="utf-8"?>
<RelativeLayout xmlns:android="http://schemas.android.com/apk/res/android"
    xmlns:tools="http://schemas.android.com/tools"
    android:layout_width="match_parent"
    android:layout_height="match_parent"
    android:paddingBottom="@dimen/activity_vertical_margin"
    android:paddingLeft="@dimen/activity_horizontal_margin"
    android:paddingRight="@dimen/activity_horizontal_margin"
    android:paddingTop="@dimen/activity_vertical_margin"
    tools:context="parthvora.com.myapplication.MainActivity">

    <EditText
        android:layout_width="wrap_content"
        android:layout_height="wrap_content"
        android:id="@+id/editText"
        android:layout_alignParentTop="true"
        android:layout_alignParentLeft="true"
        android:layout_alignParentStart="true"
        android:layout_alignParentRight="true"
        android:layout_alignParentEnd="true" />

    <Button
        android:layout_width="wrap_content"
        android:layout_height="wrap_content"
        android:text="Click Me"
        android:id="@+id/button"
        android:layout_below="@id/editText"
        android:layout_centerHorizontal="true"
        android:layout_marginTop="100dp" />

    <TextView
        android:layout_width="wrap_content"
        android:layout_height="wrap_content"
        android:id="@+id/textView"
        android:layout_below="@id/button"
        android:layout_marginTop="20dp" />

</RelativeLayout>

This is the basic layout that will show two things EditText to enter the text and Button to click, if you run the application in the Emulator. For configuring the Emulator please visit AVD Setup. This was just the designing portion, for the click of the button to work, we need to jump to the src folder and go to MainActivity.java file and edit it with the following code to make it click and do something when the button gets clicked.

import android.support.v7.app.AppCompatActivity;
import android.os.Bundle;
import android.view.View;
import android.widget.Button;
import android.widget.EditText;
import android.widget.TextView
import android.widget.Toast;

public class MainActivity extends AppCompatActivity {

    EditText name;
    TextView text;
    Button btn;

    @Override
    protected void onCreate(Bundle savedInstanceState) {
        super.onCreate(savedInstanceState);
        setContentView(R.layout.activity_main);
        name = (EditText) findViewById(R.id.editText);
        text = (TextView) findViewById(R.id.textView);
        btn = (Button) findViewById(R.id.button);

        btn.setOnClickListener(new View.OnClickListener() {
            @Override
            public void onClick(View v) {
                text.setText(name.getText());
            }
        });
    }
}

So, this is the code file where we have declared the EditText, TextView and Button. In onCreate method we have initialized them using findViewById method and we have added a setOnClickListener method on the Button that is used to get the click event when user wants to click on the button in your app. Now, on click of the button we want to set the text from EditText and set it in the TextView which will be seen below the button in our app when the user will click on the button. setText is the method using which we can set the text and getText method is used to get the text from the EditText which will be entered by the user.

Tuesday, February 16, 2016

Keeping in Mind the Following Stuff in Android Studio

Take a look at this image. Here you will have to remember some things that will help you to create an Android Application.


 Here you can see there is a flow of files which is located in the app directory, wherein all of the important files are situated. The first of them is the Android Manifest file where all your android app settings are written and added. Also, you can specify Android Permissions and can change your Android Applications name here. Android Permission is the list of all available permission that you want to use in your app from the Android System. Next is the java folder in which all your java source code files will be located. And last is the res folder where all the resource linking to your android app is stored here. In res->layout, all your layouts are stored which are written in XML. In res->values you can add colors.xml for themes and string.xml for common strings that will be used in your app.

Monday, February 15, 2016

Understanding Android Activity Life Cycle

Firstly, to start creating your android app you must be clear with almost all of the basics that it takes for any developer to develop an android app. The basics to create your android app includes JAVA Programming, Understanding of Object Oriented Programming (OOPs) concepts, XML files and a good memory to remember these. If you want to become a good android developer for yourself, then these are the minimum required skills to take off. You can visit Programming Simplified also.

Lets first start with the Android Activity. Activity according to me is a web page as in a website. You can see the page and can interact with it to do something. Similarly, in android term, Activity is an application component that helps the users to interact with it using a screen for doing something. Examples: Take a photo, Call someone, Read Email, View a Map, etc.

How does it work actually? There is a life cycle attached to each and every activity through which it responds to and works accordingly. Let's say, for an example, you want to run your own business. For being able to run it, you will first of all start from somewhere. Maybe it could be like collecting money first up or getting a loan from a bank, joining your family business and learning it. Here in android, the activity starts running the same as to above mentioned lines. It initializes all of its components by running its onCreate() method.


 Before the activity is shown to the user it passes to three methods onCreate(), onStart(), onResume(). After the completion of onStart() and onResume() method, the activity is seen by the user but he/she can interact with it after onResume() method. At onPause(), the activity becomes invisible and the user cannot interact with it because another activity is working in the foreground. Then comes onStop() method where the activity becomes hidden from the user and it goes in the background where the code cannot execute for it. Last is the onDestroy() method where the activity is destroyed or stopped by the user.

Friday, February 12, 2016

Getting Started with Android Studio for Android App Development

Today, I am going to start with Android Studio. Android Studio is an IDE or Integrated Development Environment which is a software that helps Software Developers or Programmers to create an Android Application.

Before we dig in, let's get it for Android App Development.
It is better to use the latest version of Android Studio which is here. After downloading you can install it. Just follow the steps in the installation. If you have any queries then do contact me. After successful installation, just start Android Studio and follow the instructions shown as below to create your first android app.

1) This is the first screen that you will see after starting the android studio. Click on the 1st menu if you want to start a new Android Studio Project. If you have already created the project then go for the 2nd menu option to open an existing Android Studio Project.

Welcome to Android Studio

2) After clicking on Start new Project you will see the below screen. Here you have to type your Android Application Name. Be careful to write it here for like first and last time. You can change it but that will take some time for you to make a change at everywhere in your project. Second is the package name or the folder name where your app project will be stored. If suppose my package is com.parth.example.MyApp then there will be three folders in my system named "com", inside it "parth" and within it "example" Now "MyApp" project will be stored inside this example folder. Third is the App Location where you want to store the source code of your Android Application in your system.


New Android Project

3) Then comes the Target Devices Option Page where you can select the android device versions for supporting your application. Also, you can choose to create any Wearables, TV, Android Auto or Glass application.

Target Android Devices

4) Now here you will see a frame of some already created themes or mockups for your android app designed by the studio. Just select one of them as per your choice and go to next page.

Add Template Theme Activity to Mobile

5) Here you can provide a suitable class name for the first activity of your android app or leave it as it is. Just click on finish. That's it you have created your first simple "Hello World" Android Application in Android Studio.

Customize the Activity

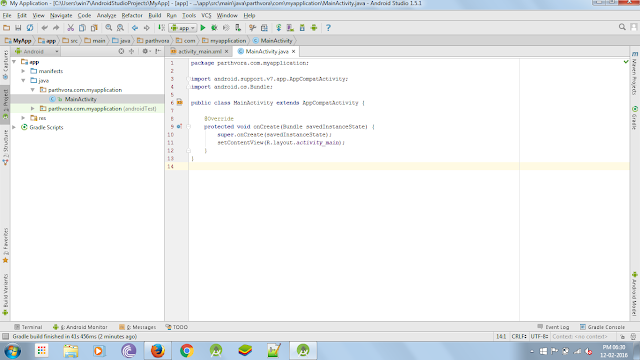
6) Finally this is where you will end up after clicking the finish button in the above-mentioned image.

Android Studio Environment

This was the setup of your basic android app. Furthermore, I will put some interesting android app posts that will help you to learn more of this Android thing. Stay Tuned....