Today, I am going to start with Android Studio. Android Studio is an IDE or Integrated Development Environment which is a software that helps Software Developers or Programmers to create an Android Application.
Before we dig in, let's get it for Android App Development.
It is better to use the latest version of Android Studio which is here. After downloading you can install it. Just follow the steps in the installation. If you have any queries then do contact me. After successful installation, just start Android Studio and follow the instructions shown as below to create your first android app.
1) This is the first screen that you will see after starting the android studio. Click on the 1st menu if you want to start a new Android Studio Project. If you have already created the project then go for the 2nd menu option to open an existing Android Studio Project.

2) After clicking on Start new Project you will see the below screen. Here you have to type your Android Application Name. Be careful to write it here for like first and last time. You can change it but that will take some time for you to make a change at everywhere in your project. Second is the package name or the folder name where your app project will be stored. If suppose my package is com.parth.example.MyApp then there will be three folders in my system named "com", inside it "parth" and within it "example" Now "MyApp" project will be stored inside this example folder. Third is the App Location where you want to store the source code of your Android Application in your system.

3) Then comes the Target Devices Option Page where you can select the android device versions for supporting your application. Also, you can choose to create any Wearables, TV, Android Auto or Glass application.

4) Now here you will see a frame of some already created themes or mockups for your android app designed by the studio. Just select one of them as per your choice and go to next page.

5) Here you can provide a suitable class name for the first activity of your android app or leave it as it is. Just click on finish. That's it you have created your first simple "Hello World" Android Application in Android Studio.

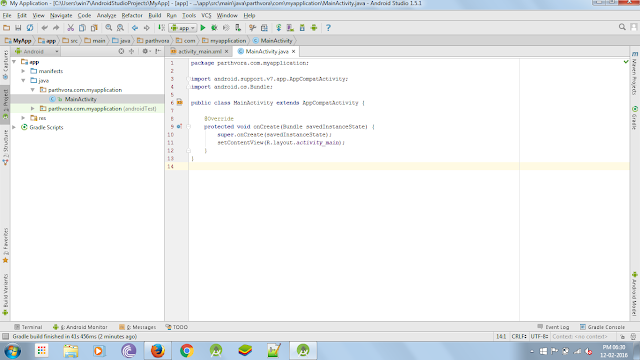
6) Finally this is where you will end up after clicking the finish button in the above-mentioned image.

This was the setup of your basic android app. Furthermore, I will put some interesting android app posts that will help you to learn more of this Android thing. Stay Tuned....
Before we dig in, let's get it for Android App Development.
It is better to use the latest version of Android Studio which is here. After downloading you can install it. Just follow the steps in the installation. If you have any queries then do contact me. After successful installation, just start Android Studio and follow the instructions shown as below to create your first android app.
1) This is the first screen that you will see after starting the android studio. Click on the 1st menu if you want to start a new Android Studio Project. If you have already created the project then go for the 2nd menu option to open an existing Android Studio Project.

2) After clicking on Start new Project you will see the below screen. Here you have to type your Android Application Name. Be careful to write it here for like first and last time. You can change it but that will take some time for you to make a change at everywhere in your project. Second is the package name or the folder name where your app project will be stored. If suppose my package is com.parth.example.MyApp then there will be three folders in my system named "com", inside it "parth" and within it "example" Now "MyApp" project will be stored inside this example folder. Third is the App Location where you want to store the source code of your Android Application in your system.

3) Then comes the Target Devices Option Page where you can select the android device versions for supporting your application. Also, you can choose to create any Wearables, TV, Android Auto or Glass application.

4) Now here you will see a frame of some already created themes or mockups for your android app designed by the studio. Just select one of them as per your choice and go to next page.

5) Here you can provide a suitable class name for the first activity of your android app or leave it as it is. Just click on finish. That's it you have created your first simple "Hello World" Android Application in Android Studio.

6) Finally this is where you will end up after clicking the finish button in the above-mentioned image.

This was the setup of your basic android app. Furthermore, I will put some interesting android app posts that will help you to learn more of this Android thing. Stay Tuned....


0 Comments:
Post a Comment