Friday, February 12, 2016

Getting Started with Android Studio for Android App Development

Today, I am going to start with Android Studio. Android Studio is an IDE or Integrated Development Environment which is a software that helps Software Developers or Programmers to create an Android Application.

Before we dig in, let's get it for Android App Development.
It is better to use the latest version of Android Studio which is here. After downloading you can install it. Just follow the steps in the installation. If you have any queries then do contact me. After successful installation, just start Android Studio and follow the instructions shown as below to create your first android app.

1) This is the first screen that you will see after starting the android studio. Click on the 1st menu if you want to start a new Android Studio Project. If you have already created the project then go for the 2nd menu option to open an existing Android Studio Project.

Welcome to Android Studio

2) After clicking on Start new Project you will see the below screen. Here you have to type your Android Application Name. Be careful to write it here for like first and last time. You can change it but that will take some time for you to make a change at everywhere in your project. Second is the package name or the folder name where your app project will be stored. If suppose my package is com.parth.example.MyApp then there will be three folders in my system named "com", inside it "parth" and within it "example" Now "MyApp" project will be stored inside this example folder. Third is the App Location where you want to store the source code of your Android Application in your system.


New Android Project

3) Then comes the Target Devices Option Page where you can select the android device versions for supporting your application. Also, you can choose to create any Wearables, TV, Android Auto or Glass application.

Target Android Devices

4) Now here you will see a frame of some already created themes or mockups for your android app designed by the studio. Just select one of them as per your choice and go to next page.

Add Template Theme Activity to Mobile

5) Here you can provide a suitable class name for the first activity of your android app or leave it as it is. Just click on finish. That's it you have created your first simple "Hello World" Android Application in Android Studio.

Customize the Activity

6) Finally this is where you will end up after clicking the finish button in the above-mentioned image.
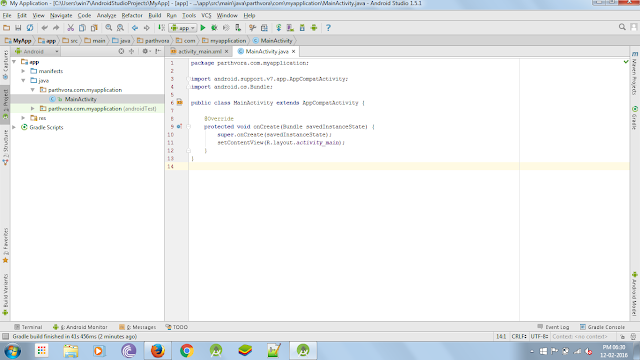
Android Studio Environment

This was the setup of your basic android app. Furthermore, I will put some interesting android app posts that will help you to learn more of this Android thing. Stay Tuned....

Thursday, February 11, 2016

Android StartUp

If you are a newbie in Android Development and want to Learn it, then here i am, starting to blog in some Android Tutorials on my own for everyone who wants to learn Android Application Development from Scratch.

But before doing that, let's go back in the year 2003 and take a look of how Android was originated. Android was founded by Andy Rubin, Rich Miner, Nick Sears and Chris White in Palo Alto, California in the year 2003.

Google acquired Android Corporation for $50 million in 2005. And the first ever Android built smartphone launched by Google was HTC Dream on October 22, 2008. After that, there has been no stopping to the world of smartphones, and of course Android, since we all know, how big is Google in developing newly defined gadgets and technologies that help most of us.

Android is built using Linux Kernel.Linux kernel is the heart of Linux operating system without which, the OS won't work as our body can't work without heart and mind. Further Android has its own Architecture or the Software Stack which is important to know how the application logic can be connected to the hardware parts of the machine in which you want to run your Android App. Here is the simple image which shows the Architecture of Android OS.


In the next blog i am going to start with the software with which you can start to create your own Android App.

Thursday, February 4, 2016

Knowing the Structure of Android App in terms of Software Engineering

Most of us want to know what is the best way of creating high quality apps in android or any other platform. But we tend to forget the basics of how to start creating apps that can become popular.


There are some things that you need to remember in order to create some good quality apps.

1) Analysis: Determine what information you have regarding the app idea that you wish to create. Try to enhance it by regularly collecting the info about your idea. This is where you would be thinking "Why to waste such time in collecting the info? It can be done while creating the app." Yes, it can be done, but at the time of developing the app, you won't be able to create the app in less time. Instead it will increase your developing time. Which is where you will sit ideally and think about collecting the info. So its better to try collecting Information ASAP.

2) Design: After that you have collected almost every bit of info about the idea that you want to create, try to design that idea into some animated graphics and awesome good looking images. Surely it will be good to look at. But remember that designing is next important part in developing any app. You need to start from logo and end up on to the last image or animation that will create some good motions in your app.

3) Developing: This is the third most important part of any app and this is where you want to showcase your coding skills. So start with all round performance by creating some good quality code and make sure that people who see your code also understand it better than you. There is a saying from Martin Fowler "Any fool can write code that a computer can understand. Good programmers write code that humans can understand." Try picking up some coding language and learn the basics of it. Remember it and then implement it in your app.

4) Testing: This is the last stage in creating any app, but not that this cycle has stopped after this. You have a lot to do after this step, if you've reached this far. Testing is not to be done here but, testing is the step which is accomplished throughout your apps creation. Testing is applied in all the above mentioned stages. In this stage(After Development Stage) you have to test your app in every aspect that comes to your mind. Test your app in almost every possible way, whether its cross platform or not, any devices like your own mobile or tablet or if it's a web app than test it in every different web browser. This is where your app is finalized to be distributed in the market and it will lend you some profit.

Well, this is it for this post where i have put some theory talk that may help you to understand the structure of any software that you want to build. After all, an android app is a software for mobiles.

Monday, September 14, 2015

Java program print prime numbers


This java program prints prime numbers, number of prime numbers required is asked from the user. Remember that smallest prime number is 2.

Java programming code


import java.util.*;
 
class PrimeNumbers
{
 public static void main(String args[])
 {
 int n, status = 1, num = 3;
 
 Scanner in = new Scanner(System.in);
 System.out.println("Enter the number of prime numbers you want");
 n = in.nextInt();
 
 if (n >= 1)
 {
 System.out.println("First "+n+" prime numbers are :-");
 System.out.println(2);
 }
 
 for ( int count = 2 ; count <=n ; )
 {
 for ( int j = 2 ; j <= Math.sqrt(num) ; j++ )
 {
 if ( num%j == 0 )
 {
 status = 0;
 break;
 }
 }
 if ( status != 0 )
 {
 System.out.println(num);
 count++;
 }
 status = 1;
 num++;
 } 
 }
}

Output of program:


We have used sqrt method of Math package which find square root of a number. To check if an integer(say n) is prime you can check if it is divisible by any integer from 2 to (n-1) or check from 2 to sqrt(n), first one is less efficient and will take more time.

Thursday, September 10, 2015

Java program to find factorial

This java program finds factorial of a number. Entered number is checked first if its negative then an error message is printed.

Java programming code

import java.util.Scanner;
class Factorial { 
public static void main(String args[]) { 
int n, c, fact = 1;   
System.out.println("Enter an integer to calculate it's factorial"); 
Scanner in = new Scanner(System.in);   
n = in.nextInt();   
if ( n < 0 ) 
System.out.println("Number should be non-negative."); 
else { for ( c = 1 ; c <= n ; c++ ) 
fact = fact*c;   
System.out.println("Factorial of "+n+" is = "+fact); 
} 
} 
}
Output of program:


You can also find factorial using recursion, in the code fact is an integer variable so only factorial of small numbers will be correctly displayed or which fits in 4 bytes. For large numbers you can use long data type.

Java program for calculating factorial of large numbers


Above program does not give correct result for calculating factorial of say 20. Because 20! is a large number and cant be stored in integer data type which is of 4 bytes. To calculate factorial of say hundred we use BigInteger class of java.math package.

import java.util.Scanner; 
import java.math.BigInteger; 
class BigFactorial { 
public static void main(String args[]) { 
int n, c; 
BigInteger inc = new BigInteger("1"); 
BigInteger fact = new BigInteger("1"); 
Scanner input = new Scanner(System.in); 
System.out.println("Input an integer"); 
n = input.nextInt(); 
for (c = 1; c <= n; c++) { 
fact = fact.multiply(inc); 
inc = inc.add(BigInteger.ONE); 
} 
System.out.println(n + "! = " + fact); 
} 
}
We run the above java program to calculate 100 factorial and following output is obtained.
Input an integer
100
100! = 93326215443944152681699238856266700490715968264381621468592963895217599993229915608941463976156518286253697920827223758251185210916864000000000000000000000000